|
RESEARCH DEVELOPMENT Kurt Grey Physiotherapist |
Practicing accurate measurement of areas -The relation between the size of the lesion,the transducer size and the treatment time |
||||||||
|
Main Menu:
ULTRASOUND Research and Development:
Clinical guidance Tools and Tutorials:
MISCELLANEOUS:
LINKS Contact:
Downloads:
Latest update : 30-11-2011
|
|
 |
 |
| Fig 1. Circular lesion outline with matching ellipse. | Fig 2. The hatched areas equalize one another. |
HOW?
During palpation the lesion should be drawn on the skin (the circle in fig.1). The line should be resistant to the coupling agent you use. I prefer a waterproof permanent ink-pen together with coupling gel or oil, which allows the line to be visible during the entire treatment and acts as a guideline for the transducer. The transducer "house" is often larger than the metal plate. The plate is usually larger than the transverse section of the beam. In my equipment the difference is 8 mm. An extra guideline 8 mm outside of the palpation trace can prevent the course of the transducer from being too narrow or inaccurate. This guideline area should not be measured, since it is not exposed to ultrasound.
When you have finished the palpation and the drawing, put the plate with ellipses over the drawing on the skin and move it around, until the best fit between the drawing on the skin and one of the ellipses has been found.
The scale should be read in as much detail as possible to achieve the best accuracy. The scale shows the area (A) in square centimetres.
Fig. 1 demonstrates how to apply this method to areas, that are not elliptical, if only they present some symmetry. The hatched areas in fig.2 equalize one another (loss=gain, vertical versus horizontal pattern)
CLEANING.
To protect the plate during use and to allow cleaning or disinfection, put the plate inside a plastic cover.
TAPE MEASURE
WHAT?
Some will prefer a TAPE measure to determine the size of an area. An ordinary flexible measuring tape will bend nicely around the surface curve, and is read with suitable accuracy (centimetres with one decimal e.g. 3.1 cm rather than 3 cm). It works better with irregular areas, if you don’t mind the extra calculations.
HOW?
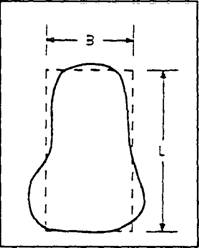
Start with a palpation and drawing on the skin of the outline of the lesion. A permanent ink pen that is resistant to the coupling medium is preferred. (See the pear shape in fig.3).
 |
|
Fig 3. Draw the outline of the lesion on the skin. Mark the length(l) and width(b). Area = l x b |
Estimate the length (L) and width (B) and mark them on the skin. Read the measure as accurately as possible (centimetres with one decimal) and multiply to reach the lesion area. (Area = L x B).
Be accurate: 3.1cm x 1.7cm = 5.27cm² instead of 3 x 2 = 6cm².
The error in this example is 13%.
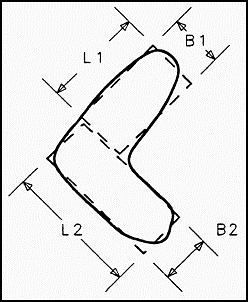
More irregular shapes require a subdivision in two or more
rectangles (fig. 4).![]()
 |
|
Fig 4. Subdivision of complex lesion area. |
ACCURACY.
The plate with ellipses has an accuracy of -0.3% (SD=6.2%). The accuracy for tape measure is -0.5% (SD=9.8%). Tape measure is more versatile, but the two methods work well together.
Test areas:
Challenge and improve your skills with these test areas:
Open the links to the test areas (pdf- files), and print them on two sheets of paper, and then try out your favourite measuring method.
The drawings were made by CAD software with extreme accuracy. The true results are printed upside down.
Please note that printing, scanning and Xerox copying may change the shape and size of the test areas by zooming and skewing the original!
Please check the control measures (5 x 10 cm) on the printed sheets, before using them to determine your measuring skills!
- 0 -